
The build is back!
When Eaglemoss went under just about a year ago in July, I feared the worst for my subscription Ecto-1 build. The kit was a whole lot of fun. And, if you followed along with our builds on the Ghostbusters Interdimensional Crossrip podcast, Chris and I had a great chat every time we would sit and work on our models. It was a double-whammy to have lost the flow of subscription kits and to lose that amazing time with Chris. It sure seemed like a lot of us were going to be stuck with half (or less) built Ecto-1 models.

Enter the good folks at Fanhome, who have taken over the licenses from Eaglemoss and resurrected the subscriptions from the dead. You can now sign up to start from issue one, or pick up from where you may have left off with Eaglemoss and continue via Fanhome. Fanhome has made it super easy to pick which issue you need to begin with and their intuitive website and responsive customer service have been a breath of fresh air.
With the podcast having switched to a more infrequent model, I’ve decided to detail my builds here on the news blog hopefully as reference for those who may need it or for a quick overview for those of you who may be on the fence about joining the club. The model is amazing in quality, and Fanhome gives you all the tools that you need (with a few expendable exceptions like painters tape that I’ll get into a bit later here). If you’re a lot like me and you need 20-30 minutes of downtime to just follow instructions and enter a zen meditative state, this build is for you. It’s just challenging enough to make it fun without being frustrating and, as the end results start to come together, having your own faithful 1:8 scale Ecto sitting on shelf sure is cool as hell.
Fanhome was kind enough to send over a new initial kit, which we’ll be building here on the HQ in the future, but for now - I’m going to pick up with where I left off a year ago, with Issue 29 (Stages 107 through 110), which comprises parts of the left and right rear wheel wells, and the ‘59 Miller Meteor Ecto-1’s iconic red tail fins.
WIth that, let’s crack into it, eh?
When Issue 29 arrived, I cackled with glee. Again, not thinking that this model would ever see completion, getting a box in the mail from Fanhome was a treat. Fanhome sends your monthly subscription in a brilliant purple package, another step beyond the generic mailers that would come from Eaglemoss. The company is really making your monthly shipments a grand event, and it’s pretty cool.
The first thing you’ll notice with this issue’s shipment is that it includes a revised passenger front door. Eaglemoss had mistakenly sent out their kits with a passenger mirror recessed in the initial stage and had been promising a fixed door to those who waited. When it didn’t look like Eaglemoss was coming back, I went ahead and built out the door that I had been sent and attached it to the body of the car — so I’m not entirely sure what to do. Pulling the door off at this point would be a pretty dramatic overhaul. But if I’m going to do it, now’s going to be the chance. I set the revised door aside and… I’ll make that decision later. Worst case, I have an Ecto with a stem for a passenger mirror. Ha!
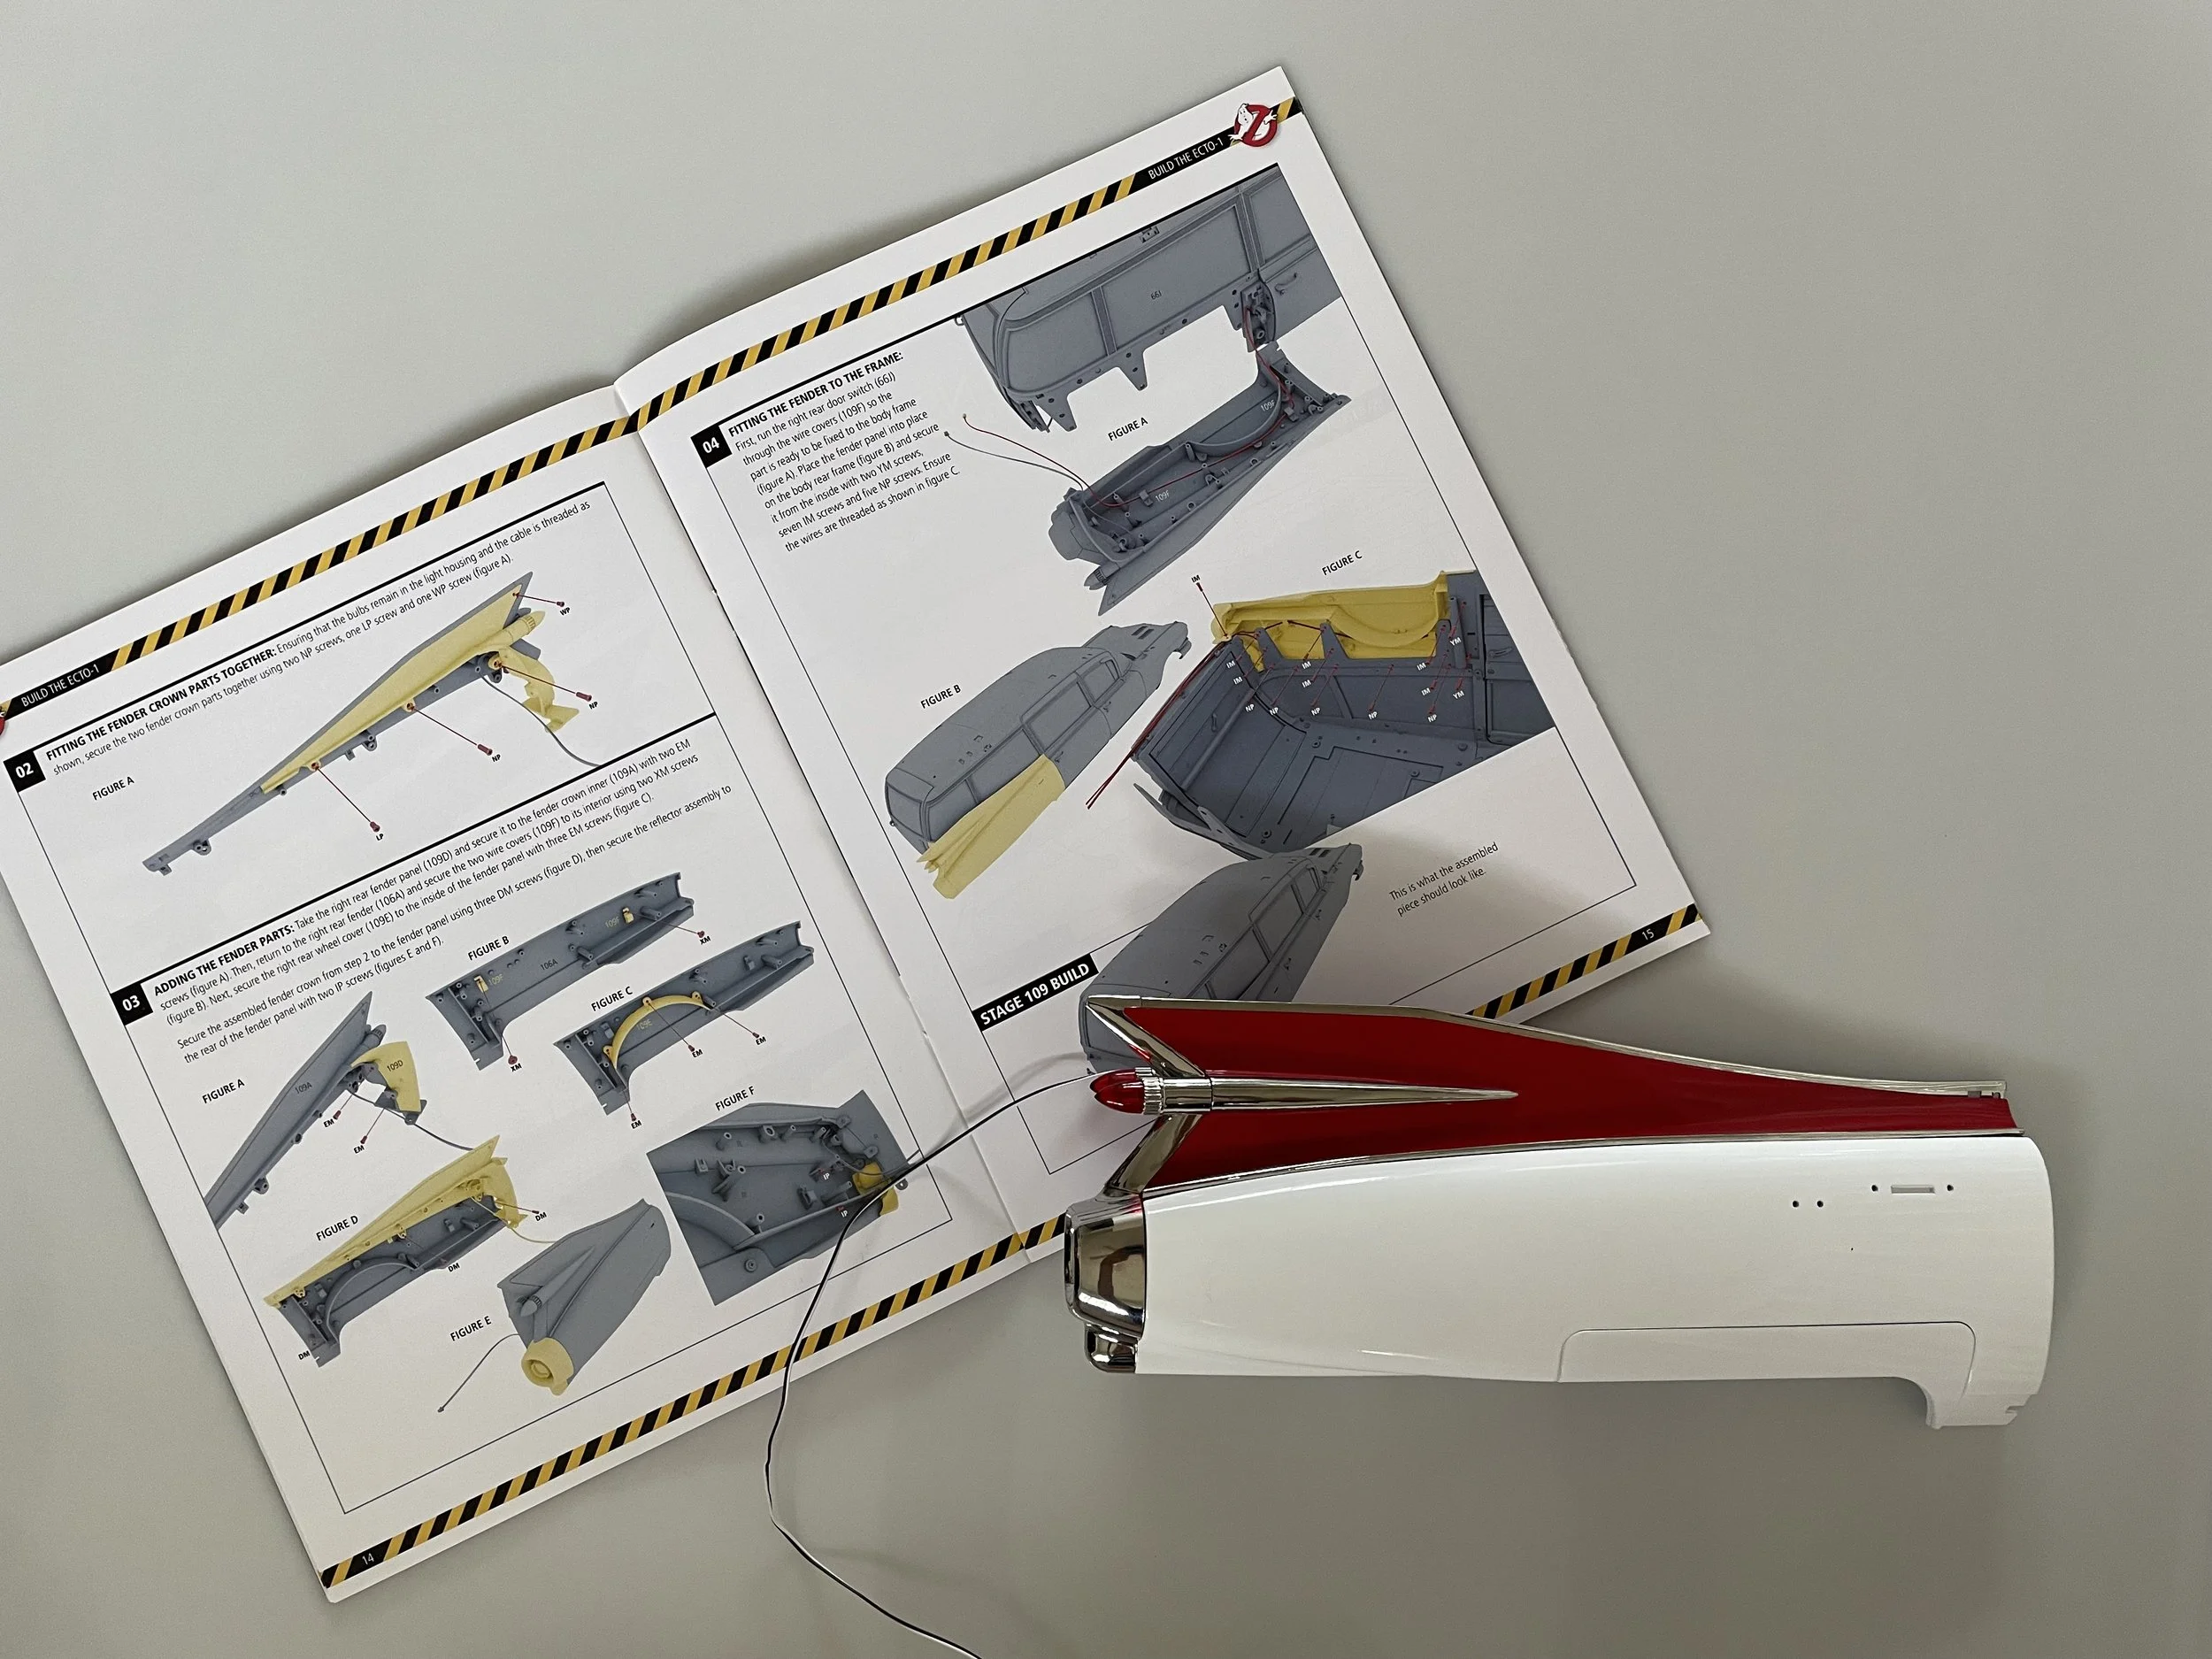
The door conundrum aside, Stage 107 is pretty straight-forward and a relative breeze. The right rear fender “crown” has just two steps. But key on this one is that the chrome trim at the top of the fin doesn’t attach permanently at this point in the build, so you have to be careful not to lose both it and the rear trim. If you plow through the whole issue, it isn’t that big of a deal. But if you pace yourself out and only do one stage at a time, don’t forget it’s another piece you need to set aside for later. Pro-tip: I have a gallon-sized Ziplock that I set aside which contains only the parts that you’ve set aside for later (things like the steering wheel, etc.). If I know I’m going to have to come back to it later, into the Ziploc it goes.
Stage 108, the Right Rear Reflector and Outer Light Lens is also pretty straightforward and cruises by in a snap. The one thing to look out for on this stage is that the outside inner lens is a very small clear piece that isn’t seated in the tray too well when you open it. Chances are, it will pop out when you open up the package and blends into its surroundings with relative ease. At first, I thought my kit was missing the lens but later discovered it floating in the tray.
Also a curious last step to this stage, you have to replace two screws on either side of the car’s body with flatter machine screws than what were initially installed. I’m thinking this was a course correct for an error that may have popped up earlier in the build. And, when you attach the whole completed part to the body of the car, it actually makes a lot of sense that you need a good flush connection to hold all the plastic pieces against the body of the car.
Stage 109 is where the challenge of this particular issue comes into play. The rear fins have two main pieces with two horizontally mirroring rear tail lights. And, while the assembly of the pieces in this stage isn’t the hardest of steps (that continues to be building the engine at the beginning of the build), the wiring to get the LED wires and bulbs into the tail lights is a bit tricky. You have to pull one of the wires marked R off of your assembled body and wire it into this piece. It took me a bit of trial and error but I found that bending the wire behind the bulb lens slightly to fish the bulb into the housing was a good first step. Then, using the flat back of the supplied tweezers, you can almost shoehorn the bulb into place. The bulb doesn’t seem to go ALL the way into the lens, but it does pop in enough that it won’t shake around or fall out of place.
Once you finally get the two LED bulbs plugged into the lenses, it becomes a matter of snapping everything together into place and then attaching it to the wheel well. This is one of those fun partworks stages where you wish that you had three hands: one to hold all the pieces together, another to push further down the part, and a third hand to be turning the screws to affix everything together. In some instances, a little painter’s tape helps. Or a clamp. But with a couple goes, I was able to snap this all together without additional assistance. Only minor hand cramping. I’m old. It happens. Ha!
With the whole piece assembled, here’s the fun part: attaching it to the main body of the car. Again, after staring at my poor Ecto-1 sitting on the shelf missing wheel wells and these red fins, boy-oh-boy was this gratifying to finally do. It felt like, after a long winter working on a 10,000 piece puzzle, finding the ONE piece that had been missing for months and dropping it into place. There’s quite a bit of hardware that goes into keeping this piece in place, and you have to be careful to thread the wires exactly as they’re shown in the diagram - because they need to snake all the way around the rear of the car and through the left side wheel well also. This is where I definitely recommend a little bit of painters tape to help act as that third hand for you to keep things in place, both during this stage and after. I dropped a little piece of painter’s tape under the cargo door to keep the two wires in place for the next couple stages. Also be sure that you’re using the red tab to keep the wires under the cargo door. Tuck those guys under before you affix the IM screw down.
After quite a bit of screw turning (there’s at least seven IM screws and four NP screws to this stage), I had to flip the body over to take a look and admire. It’s been a long time coming darlin’. You deserve this moment.
The final stage to this issue is a cakewalk. You’re basically prepping to work on the other side of the rear of the car by attaching the skirting to the left rear fending. It’s a quick and easy step that you can set the finished product aside and enjoy the rest of the awesome magazine contents and drop the booklet into your binder. Hopefully after all this time, you still have your binder and the prongs to attach the magazines to them.
All in all, this was a whole lot of fun. After a year and counting of not sitting down to work on the car, I had to shake out a little rust - and realized how over-caffeinated I was with my shaky hands. I’m just so glad to be getting monthly shipments again to finish off this car and finally have what will become one of the crown-jewels in the GBHQ collection.
Our thanks to the good folks at Fanhome for reviving the subscription build, sending us stages for review and for keeping the engine running for us all. If you’d like to start up your subscription, now is the time as they’re only offering new and continued subscriptions for a limited time… presumably because they’re dealing with the limited stock from the Eaglemoss days. So act now if you’re interested and happy building!